

General Setup for Lone Wolf Workspace integration into QuickBooks Online
This is a tutorial on how to setup the Lone Wolf Workspace to QuickBooks Online Integration
Let's get started:
Section A.) Connecting QuickBooks Online to API Nation
1.) First, you will want to contact the Lone Wolf Workspace support team to assist in getting the process started: [email protected]
2.) From here, you will want to click directly on the 'Gear' icon on the upper right side of the screen:

3.) Once you've clicked this button you should be on a new page, we'll want to scroll down and locate 'Service Integrations' and click on 'View Integrations':

4.) From here, we will to locate the integration for 'QuickBooks Online' and click on 'View Settings':

5.) Now that we're on the page for QuickBooks Online, we'll want to click on' Setup New Workflows' to get to our configuration settings:

6.) From here we'll be re-routed to API Nation and we'll be asked to 'Connect to QuickBooks', we'll want to click this button to begin connecting QuickBooks Online to API Nation:

7.) From here, we will want to enter our credentials for QuickBooks Online and then click 'Sign In':

8.) After this, we'll want to allow API Nation to connect to your QuickBooks Online account by clicking on 'Connect':

Once this has been done, we should have QuickBooks Online connected to API Nation, in the next section we will review the settings for your integration!
Section B.) Configuring the settings for your Integration
In this section, we'll break things out into separate sections for each part of the page on the screen, we will start with the 'Income Section'.
1A.) Income Configuration (Sales receipts)
Below, we have have a photo of the income section, there are nine options that will need to be selected; below the image we will utilize letters and break down what each one means below the image:

A.) Bank Account - Standard Funding
-
This field allows the user to select a default Bank Account that should be used in Standard Funded transactions. This means that if the Memo Text from Lone Wolf Workspace does not match an existing Bank Account in QuickBooks Online, the default will be used.
B.) Default Product / Service for Standard Funding
-
This field allows the user to select a default Product/Service that should be used for line items in Standard Funded transactions. This means that if the Memo Text from Lone Wolf Workspace does not match an existing Product/Service in QuickBooks Online, the default will be used.
C.) Table Funding Account
-
This field allows the user to select the Bank Account for Sales Receipts in QuickBooks Online in Table Funded transactions. Please note that this field will also be the same for the Table Funding Account for expenses.
D.) Default Product / Service for Table Funding
-
This field allows the user to select a default Product/Service that should be used for line items in Table Funded transactions. This means that if the Memo Text from Lone Wolf Workspace does not match an existing Product/Service in QuickBooks Online, the default will be used.
E.) Customer (Payer)
-
This field allows the user to select either one Customer for all transactions, or to allow the sync to find/create Customers from the data in Lone Wolf Workspace.
F.) Payment Date
-
'Let QuickBooks Decide' - This uses the date the Sales Receipt is created, the same date that the transaction is Set to Funded
-
'Funding Date in Lone Wolf Workspace' - This uses the date the Funding Confirmation is created in Lone Wolf Workspace
-
'Closing Date from Lone Wolf Workspace' - This uses the closing date of the transaction
G.) Class
-
'Use PBOffice Setting' - This uses the class specified in Lone Wolf Workspace's platform
-
'Specific Class' - This option will set all Sales Receipts to use a specific class based on what the user has in QuickBooks Online
H.) Location
-
'Use PBOffice Setting' - This uses the location specified in Lone Wolf Workspace's platform
-
'Specific Class' - This option will set all Sales Receipts to use a specific location based on what the user has in QuickBooks Online
I.) Memo
-
'Use Lone Wolf Workspace Back Office Notes' - This will use the 'Notes' within the specific Lone Wolf Workspace transaction's notes
-
'Use Custom Memo' - This option will allow the user to input whatever text they'd like as the memo.
1B.) Income Configuration (Deposits)
Below, we have have a photo of the income section, there are nine options that will need to be selected; below the image we will utilize letters and break down what each one means below the image:

A.) Bank Account - Standard Funding
-
This field allows the user to select a default Bank Account that should be used in Standard Funded transactions. This means that if the Memo Text from Lone Wolf Workspace does not match an existing Bank Account in QuickBooks Online, the default will be used.
B) Default Account for Standard Funding
-
This field allows the user to select a default Account that should be used in Standard Funded transactions. This means that if the Memo Text from Lone Wolf Workspace does not match an existing Account in QuickBooks Online, the default will be used.
C.) Table Funding Account
-
This field allows the user to select the Bank Account for Deposits in QuickBooks Online in Table Funded transactions. Please note that this field will also be the same for the Table Funding Account for expenses.
D.) Default Account for Table Funding
-
This field allows the user to select a default Account should be used for line items in Table Funded transactions. This means that if the Memo Text from Lone Wolf Workspace does not match an existing Account in QuickBooks Online, the default will be used. Please note that this field will also be the same for the Table Funding Account for expenses.
E.) Customer (Payer)
-
This field allows the user to select either one Customer for all transactions, or to allow the sync to find/create Customers from the data in Lone Wolf Workspace.
F.) Payment Date
-
'Let QuickBooks Decide' - This uses the date the Deposit is created, the same date that the transaction is Set to Funded
-
'Funding Date in Lone Wolf Workspace' - This uses the date the Funding Confirmation is created in Lone Wolf Workspace
-
'Closing Date from Lone Wolf Workspace' - This uses the closing date of the transaction
G.) Class
-
'Use PBOffice Setting' - This uses the class specified in Lone Wolf Workspace's platform
-
'Specific Class' - This option will set all Sales Receipts to use a specific class based on what the user has in QuickBooks Online
H.) Location
-
'Use PBOffice Setting' - This uses the location specified in Lone Wolf Workspace's platform
-
'Specific Class' - This option will set all Sales Receipts to use a specific location based on what the user has in QuickBooks Online
I.) Memo
-
'Use Lone Wolf Workspace Notes' - This will use the 'Notes' within the specific Lone Wolf Workspace transaction's notes
-
'Use Custom Memo' - This option will allow the user to input whatever text they'd like as the memo.
2.) Expense Configuration (Checks)
Below, we have have a photo of the income section, there are eight options that will need to be selected; below the image we will utilize letters and break down what each one means below the image:

A.) Vendor (Agent)
-
This field allows the user to select either one Vendor for all transactions, or to allow the sync to find/create Vendors from the data in Lone Wolf Workspace.
B.) Payment Date
-
'Let QuickBooks Decide' - This uses the date the Check is created, the same date that the transaction is Set to Funded
-
'Funding Date in Lone Wolf Workspace' - This uses the date the Funding Confirmation is created in Lone Wolf Workspace
-
'Closing Date in Lone Wolf Workspace' - This uses the closing date of the transaction
C.) Checking Account
-
This field allows the user to select the Bank Account for Checks in QuickBooks Online in Standard Funded transactions.
D.) Default Category for Standard Funding
-
This field allows the user to select a default Category that should be used for line items in Standard Funded transactions. This means that if the Memo Text from Lone Wolf Workspace does not match an existing Category in QuickBooks Online, the default will be used.
E.) Default Category for Table Funding
-
This field allows the user to select a default Category that should be used for line items in Table Funded transactions. This means that if the Memo Text from Lone Wolf Workspace does not match an existing Category in QuickBooks Online, the default will be used.
F.) Memo
-
'Use Lone Wolf Workspace Notes' - This will use the 'Notes' within the specific Lone Wolf Workspace transaction's notes
-
'Use Custom Memo' - This option will allow the user to input whatever text they'd like as the memo.
G.) Class
-
'Use PBOffice Setting' - This uses the class specified in Lone Wolf Workspace's platform
-
'Specific Class' - This option will set all Checks to use a specific class based on what the user has in QuickBooks Online
H.) Location
-
'Use PBOffice Setting' - This uses the location specified in Lone Wolf Workspace's platform
-
'Specific Class' - This option will set all Checks to use a specific location based on what the user has in QuickBooks Online
Section C-1.) How information is sent from Lone Wolf Workspace to QuickBooks Online (Sales Receipts and Checks)
Now that our integration is in place, we'll review how information from Lone Wolf Workspace is sent to QuickBooks Online, in this example we'll take a look at how 'Sales Receipts' and Checks' will be created in QuickBooks Online from Lone Wolf Workspace.
1.) To get started, lets take a look at how we've configured our integration to create and map Sales Receipts, this can be viewed in the screenshot below:
Sales Receipt Configuration/Mapping Example

Check Configuration/Mapping Example

2.) Now that we've seen how our Sales Receipts and Checks are setup to map to QuickBooks Online, we can take a look at an example transaction in Lone Wolf Workspace:

3.) Before we start syncing, it's important to note that the easiest way to reference which data will land in QBO is by viewing the 'Funding Confirmation' that is generated within Lone Wolf Workspace, so for this transaction, the 'Funding Confirmation' looks like below:
Funding Confirmation Example For Transaction That Creates Checks and Sales Receipts

4.) Now that we've viewed this, we can click the button in Lone Wolf Workspace that says 'Sync to QBO':

5.) At this point, information should be sent to QuickBooks Online within about 20-30 seconds of clicking this button; for this transaction, we'll generate two Sales Receipts and a single check, lets see how they look below:
Example Data For Transaction That Creates Checks and Sales Receipts Within QuickBooks Online
First Sales Receipt Example
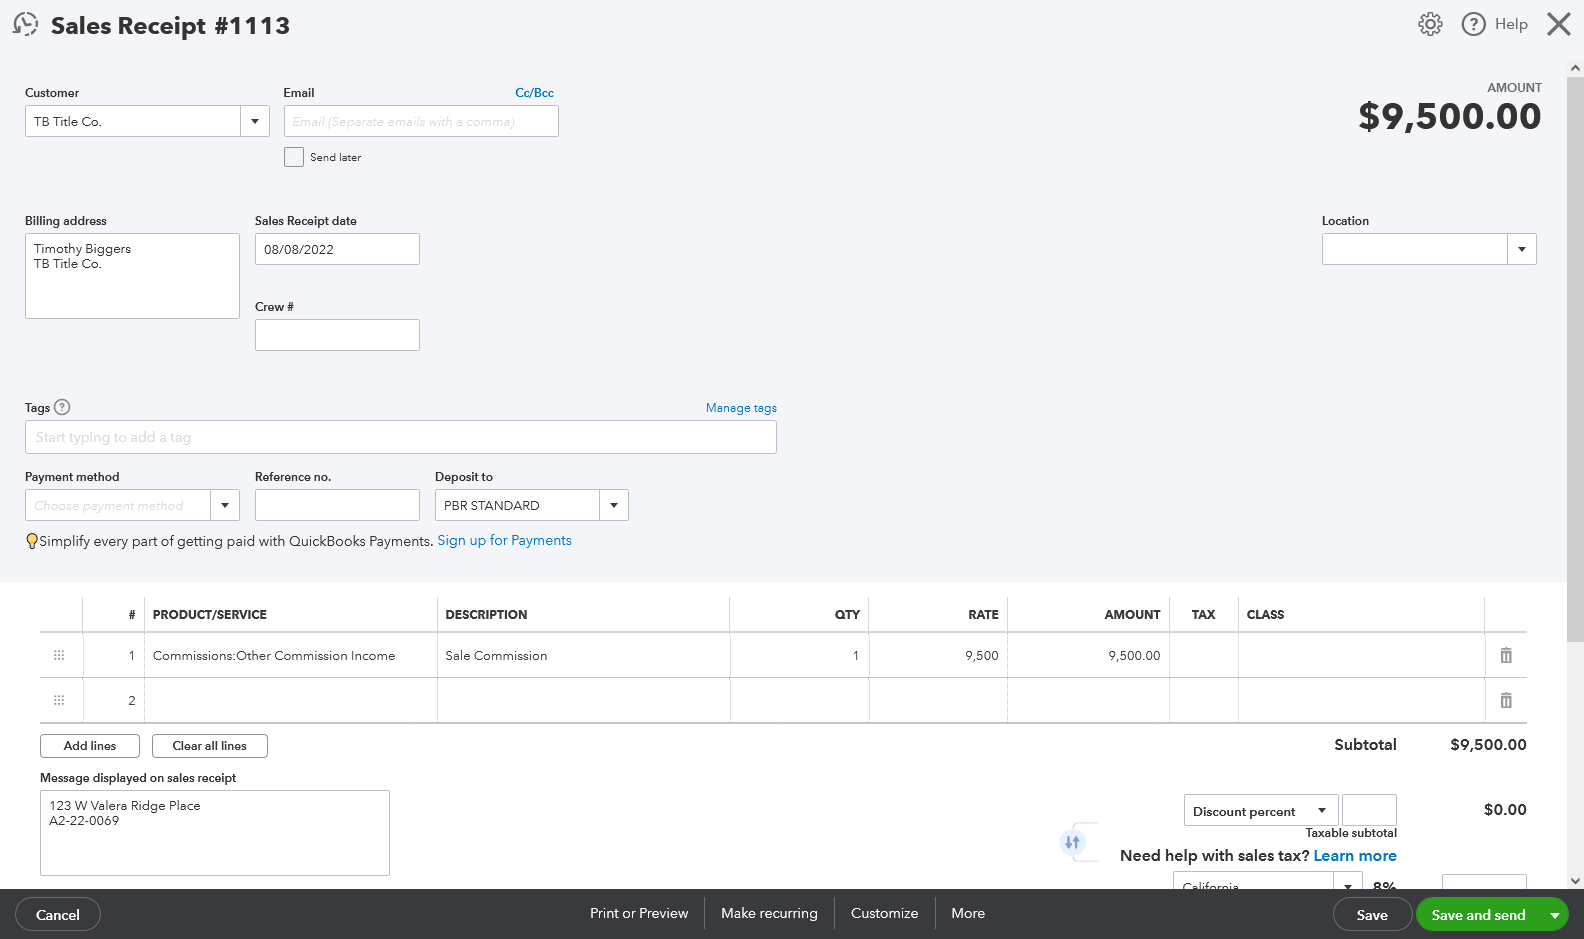
Second Sales Receipt Example

Check Example

And this is how this type of configuration would reflect in QuickBooks Online based on the transaction that was sent from Lone Wolf Work Space!
Section C-2.) How information is sent from Lone Wolf Workspace to QuickBooks Online (Deposits and Checks)
Now we will be utilizing a different example of how we can configure our Lone Wolf Workspace to QuickBooks Online integration, in this example we'll take a look at how 'Deposits' and 'Checks' will be created in QuickBooks Online from Lone Wolf Workspace.
1.) To get started, lets take a look at how we've configured our integration to create and map Deposits, this can be viewed in the screenshot below:
Deposit Configuration/Mapping Example

Check Configuration/Mapping Example

2.) Now that we've seen how our Deposits and Checks are setup to map to QuickBooks Online, we can take a look at an example transaction in Lone Wolf Workspace:

3.) Before we start syncing, it's important to note that the easiest way to reference which data will land in QBO is by viewing the 'Funding Confirmation' that is generated within Lone Wolf Workspace, so for this transaction, the 'Funding Confirmation' looks like below:
Funding Confirmation Example For Transaction That Creates Checks and Deposits

4.) Now that we've viewed this, we can click the button in Lone Wolf Workspace that says 'Sync to QBO':

5.) At this point, information should be sent to QuickBooks Online within about 20-30 seconds of clicking this button; for this transaction, we'll generate a single Deposit and a single check, lets see how they look below:
Example Data For Transaction That Creates Deposits and Sales Receipts Within QuickBooks Online
Deposit Example

Check Example

And this is how this type of configuration would reflect in QuickBooks Online based on the transaction that was sent from Lone Wolf Work Space!

